Log In
Register
Forums
General Jaguar Forums
New Member Area - Intro a MUST
Jaguar Forums Feedback & Suggestion Center
General Tech Help
Regional
Jaguar Models ( Current )
XF (X260)
F-Type ( X152 )
XE ( X760 )
E-Pace
F-Pace (X761) / C-X17
I-Pace EV
Jaguar Models ( Modern )
XF and XFR ( X250 )
XJ ( X351 )
X-Type ( X400 )
S-Type / S type R Supercharged V8 ( X200 )
XJ XJ6 / XJ8 / XJR ( X350 & X358 )
XJ XJ8 / XJR ( X308 )
XJ XJ12 ( X305 )
XJ XJ6 / XJR6 ( X300 )
XK8 / XKR ( X100 )
XK / XKR ( X150 )
Jaguar Models ( Classics )
Mark V - X 420G
MKI / MKII S type 240 340 & Daimler
XK120 XK140 XK150
E type ( XK-E )
XJ6 & XJ12 Series I, II & III
XJS ( X27 )
XJ40 ( XJ81 )
XKSS
XJ220
Other Jaguars
Other Jaguar Models / Concepts / Replicas
Diesel variants
Diesel variants - All models
Non Jaguar vehicles
Non-Jaguar Vehicles
Brand Review
Jaguar Press release
Jaguar Customer Relationship Centre
Jaguar Engines & transmissions
Wheels / Tires, Suspension & handling
Interior
Exterior
Audio/Visual Electronics
Detailing / Car care
Motorsports
Jaguar Classifieds
Marketplace
PRIVATE For Sale / Trade or Buy Classifieds
VENDOR 'For Sale' Classifieds
Official Site Sponsors
VENDOR Threads
General Interest / History
Sights N Sounds
Photography
Forum announcement archives / Forum History
Jaguarforums Merchandise
Memorial Section
News
Gallery
Tools
Car Payment Calculator
Tire Rim Calculator
Vin Decoder
Recalls
Technical Service Bulletins (TSBs)
Members List
Live Feed
Marketplace
Vendor Directory
Become a Vendor
Member Marketplace
Vendor Marketplace
Site Store
New Posts
View Dark Mode
Please register or login to enable Dark Mode.
Log In
Register
Threads
Google
Threads
Posts
Advanced
Dark Mode
Please register or login to enable Dark Mode.
Log In
Forgot your Password?
By logging into your account, you agree to our
Terms of Use
and
Privacy Policy
, and to the use of cookies as described therein.
or
Login with Google
Login with Facebook
Recent
Commented
Albums
My Pictures
My Post Pictures
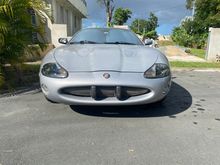
giandanielxk8
January 18, 2015
526
0
Sort:
Most Recent
Default
Most Recent
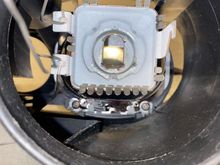
This is the high beam position.
0
2021/01/04 21:05:07
giandaniel...
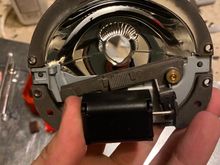
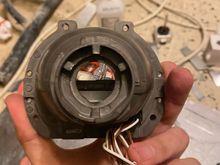
Behold the projector bowl with its cutoff shield and the solenoid. This is the low-beam position.
0
2021/01/04 21:04:08
giandaniel...
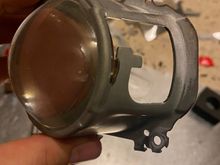
You want to keep this thing around because it will help you determine how much you need to cut from the Morimoto projector.
0
2021/01/04 21:01:36
giandaniel...
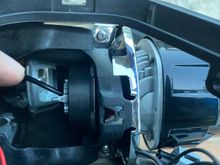
Remove this clip. It's the only thing holding the projector in place after removing the two bottom screws.
0
2021/01/04 20:57:08
giandaniel...
Remove those two phillip's head screws.
0
2021/01/04 20:55:25
giandaniel...
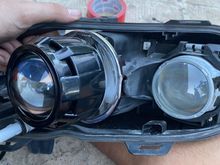
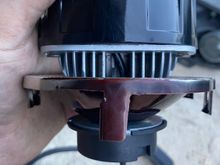
Rear of the projector.
0
2021/01/04 20:47:14
giandaniel...
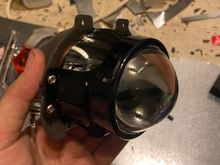
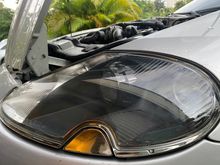
First I present the Morimoto 4TL-R Bi-xenon projector so that you guys can see what is being installed. Front ¾ view.
0
2021/01/04 20:46:58
giandaniel...
0
2020/12/20 18:05:43
giandaniel...
0
2020/12/20 18:05:36
giandaniel...
0
2020/12/20 18:05:28
giandaniel...
0
2020/12/20 18:05:21
giandaniel...
0
2020/12/20 18:05:13
giandaniel...
High Beam Only: Morimoto Mini HB LED projector
0
2020/12/15 18:22:36
giandaniel...
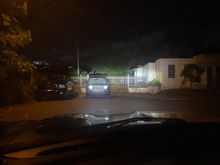
Low beam + Morimoto Mini HB LED projector High beam
0
2020/12/15 18:18:47
giandaniel...
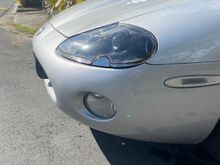
Stock low beam only.
0
2020/12/15 18:18:40
giandaniel...
Factory low beam + Morimoto Mini HB LEDProjector High beams
0
2020/12/13 17:29:20
giandaniel...
Factory low beam.
0
2020/12/13 17:28:59
giandaniel...
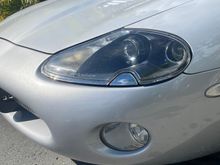
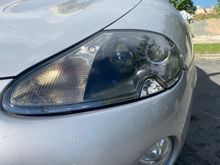
It even makes the headlight look more modern!
0
2020/12/13 17:14:50
giandaniel...
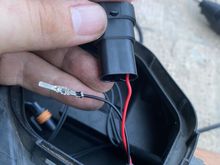
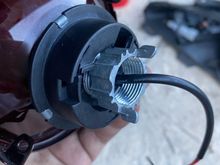
Connect the 9005/HB3 connector remember that the nub is grabbed by those two plastic tabs
0
2020/12/13 17:09:30
giandaniel...
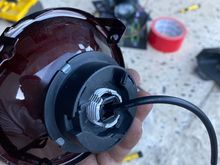
Use a plier to gently pull the leads until they snap in place.
0
2020/12/13 17:09:11
giandaniel...
Using the tab or nub as a reference point, positive goes on the right, and negative to the left.
0
2020/12/13 17:08:49
giandaniel...
This would be a good time to fit the headlight assembly as is (without the glass lens) and find some place dark to aim the projector and play with its orientation on the reflector.
0
2020/12/13 17:05:41
giandaniel...
Snap the reflector-projector assembly in place, and then fasten the Phillip's head screws that hold the reflector in place.
0
2020/12/13 17:05:20
giandaniel...
This does not necessarily mean the projector will be correctly aligned.
0
2020/12/13 17:02:15
giandaniel...
You may line up this tab (bottom one with the screw hole) with that empty space in the heat sink. This does not necessarily mean the projector will be correctly aligned.
0
2020/12/13 16:58:57
giandaniel...
0
2020/12/13 16:56:27
giandaniel...
Righty tighty gets the projector shaft all the way out. By not wearing down on the reflector portion of the hole, it itself is screwed onto the projector.
0
2020/12/13 16:52:58
giandaniel...
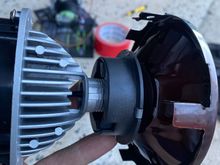
Slip the projector inside the reflector.
0
2020/12/13 16:52:32
giandaniel...
Supposedly the bottom side of the projector is the flat end, however, I found out that this doesn't mean it will be correctly aimed.
0
2020/12/13 16:47:30
giandaniel...
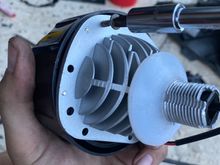
Use four screws to secure the shroud to the projector.
0
2020/12/13 16:47:14
giandaniel...
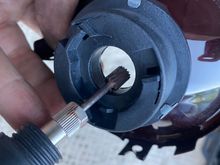
You don't need to grind down too much material. Just a little bit so that the threaded shaft can fit snugly on the plastic bulb holder.
0
2020/12/13 16:43:18
giandaniel...
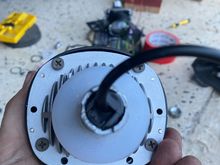
Use a Dremel with a carbide bur to increase the diameter of the reflector's bulb holder hole. DO NOT grind the reflector part of the bulb holder hole.
0
2020/12/13 16:43:00
giandaniel...
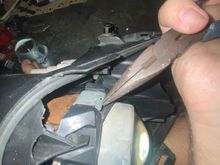
I find it's best to either pull on the left or right side of the reflector first. Trying to pull both at the same time is a wasted effort.
0
2020/12/13 16:40:20
giandaniel...
Bottom screw. A magnetic screwdriver will make your life much easier on reassembly. You could also used tape or some super glue to hold the screw driver in place.
0
2020/12/13 16:38:29
giandaniel...
Top screw.
0
2020/12/13 16:38:02
giandaniel...
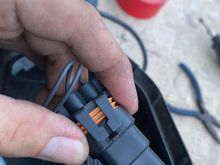
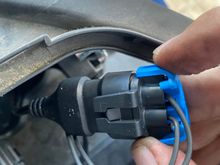
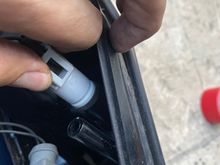
First pull the blue clip by lifting from one side, the rest will come out. Then lift the two large tabs to unlock the connector.
0
2020/12/13 16:34:32
giandaniel...
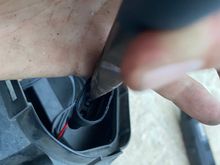
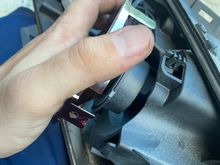
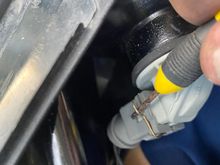
Pry the clip to disconnect the turn signal indicator connector.
0
2020/12/13 16:31:20
giandaniel...
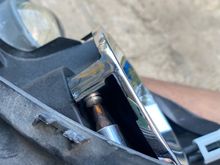
The T-10 bulb holder twists off clockwise. This is a good time to replace the bulb with an LED.
0
2020/12/13 16:30:50
giandaniel...
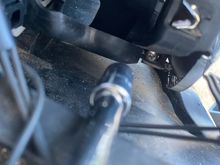
Pull assembly apart.
0
2020/12/13 16:28:07
giandaniel...
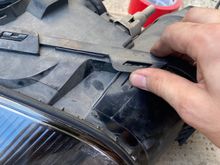
Lift tabs. There's three on top, three on the bottom, and on on each side.
0
2020/12/13 16:27:32
giandaniel...
First
Page
9 of 14
Last
Go To
Page
1
...
7
8
9
10
11
...
14
9 of 14
Go To
GO
Go to page
of 14
pages
1
...
7
8
9
10
11
...
14